MRI Liver (Breath hold Protocol)
Introduction
MRI is one of the most useful and rapidly developing diagnostic tools for evaluating liver pathologies. MRI allows the acquisition of images with excellent tissue contrast and anatomical detail. It is particularly effective in visualizing liver tissue and can detect and characterize focal liver lesions. The success of liver imaging depends primarily on the technique and optimization of pulse sequences. Fast breath-hold T1 and T2 sequences with smaller slice thickness and high resolution are routinely used for liver imaging. Contrast-enhanced T1-weighted scans play a significant role in liver imaging due to their high sensitivity and specificity in detecting and characterizing focal hepatic lesions.
Contrast Agents for liver imaging
Intravenous contrast can enhance the sensitivity and specificity of MRI scans for lesion detection and characterization, as well as differentiate between benign and malignant liver masses. Contrast enhancement characteristics are frequently utilized for specific diagnosis of pathologies. Multiple contrast agents are accessible for liver imaging, including nonspecific extracellular contrast agents, hepatocyte-specific contrast agents, or a combination of both.
Extracellular contrast agents:-
Gadolinium-based contrast agents have been extensively utilized in liver MRI for several years. These agents contain gadolinium, a paramagnetic metal ion that reduces T1 relaxation time and results in positive enhancement on T1 weighted scans. Following administration, gadolinium agents initially enhance the blood vessels and then quickly disperse throughout the extracellular space before being eliminated through renal excretion. The optimal liver-to-lesion contrast is typically achieved within the first 90 seconds after injection. Therefore, it is crucial to acquire dynamic sequences during this timeframe. Recent advancements have led to the development of liver-specific agents, which aim to enhance and prolong the contrast between normal and abnormal tissues, ultimately improving lesion detection.
Hepatocyte-specific contrast agents:-
Hepatocyte-targeted contrast agents are specifically absorbed by hepatocytes in the liver and excreted through the biliary system. The optimal contrast between normal and abnormal tissue is achieved 10–40 minutes after injecting hepatocyte-targeted contrast agents. Liver-specific contrast agents have been designed to differentiate between benign and malignant hepatocellular lesions based on the contrast uptake pattern by functioning hepatocytes and Kupffer cells. Tumors originating from non-hepatocytic cells (such as metastases, cholangiocellular carcinoma, non-functioning hepatocytic tumors, etc.) are unable to absorb hepatocyte-targeted contrast agents and therefore do not show enhancement in the post-contrast scans.
Indications for liver MRI
- Evaluation of diffuse liver disease such as haemochromatosis, haemosiderosis, fatty infiltration
- Detection of focal hepatic lesions metastasis, focal nodular hyperplasia, hepatic adenoma
- Lesion characterization, e.g. cyst, focal fat, haemangioma, hepatocellular carcinoma
- Clarification of findings from other imaging studies or laboratory abnormalities
- Evaluation of tumour response to treatment, e.g. post-chemotherapy or surgery
- Evaluation of known or suspected congenital abnormalities
- Liver iron content determination
- Potential liver donor evaluation
- Evaluation of vascular patency
- Evaluation of cirrhotic liver
Contraindications
- Any electrically, magnetically or mechanically activated implant (e.g. cardiac pacemaker, insulin pump biostimulator, neurostimulator, cochlear implant, and hearing aids)
- Intracranial aneurysm clips (unless made of titanium)
- Pregnancy (risk vs benefit ratio to be assessed)
- Ferromagnetic surgical clips or staples
- Metallic foreign body in the eye
- Metal shrapnel or bullet
Patient preparation for MRI Liver
- A satisfactory written consent form must be taken from the patient before entering the scanner room
- Ask the patient to remove all metal objects including keys, coins, wallet, cards with magnetic strips, jewellery, hearing aid and hairpins
- Ask the patient to undress and change into a hospital gown
- Instruct the patient to hold their breath for the breath hold scans and breathe gently for the gated scans (its advisable to coach the patient two to three times before starting the scan)
- An intravenous line must be placed with extension tubing extending out of the magnetic bore
- Claustrophobic patients may be accompanied into the scanner room e.g. by staff member or relative with proper safety screening
- Offer headphones for communicating with the patient and ear protection
- Explain the procedure to the patient and answer questions
- Note down the weight of the patient
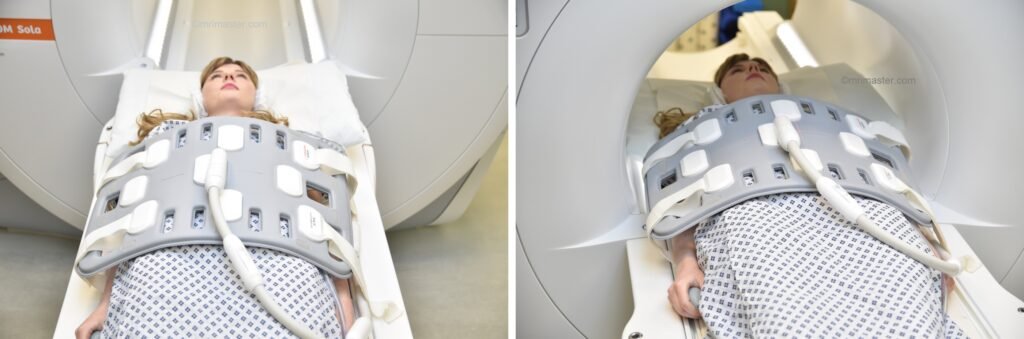
Positioning for MRI Liver
- Position the patient in supine position with head pointing towards the magnet (head first supine)
- Position the patient over the spine coil and place the body coil over the upper abdomen (nipple down to iliac crest)
- Securely tighten the body coil using straps to prevent respiratory artefacts
- Give a pillow under the head and cushions under the legs for extra comfort
- Centre the laser beam localizer over xiphoid process of sternum
Recommended MRI Liver Protocols, Parameters, and Planning
localiser Free-breathing
To localize and plan the sequences, it is essential to acquire a three-plane T2 HASTE localizer initially. These fast single-shot localizers have an acquisition time of under 25 seconds and are highly effective in accurately localizing abdominal structures.

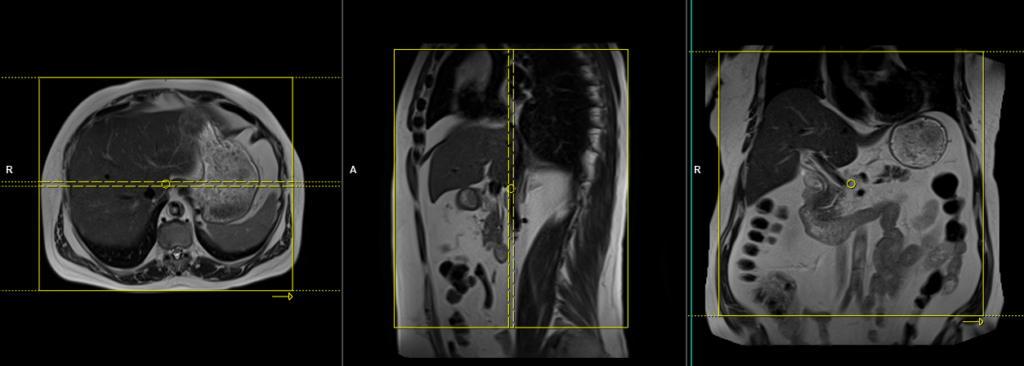
T2 tse BLADE(PROPELLER) axial respiratory gated
Plan the axial slices on the coronal free-breathing localizer images and position the block horizontally across the liver, as shown. Verify the positioning in the other two planes. Establish an appropriate angle in the sagittal plane, aligning it horizontally across the liver. The slices must be sufficient to cover the entire liver from the diaphragm down to the C loop of the duodenum. The phase direction can either be right to left or anterior-posterior, as radial k-space sampling will eliminate potential motion artifacts. Use phase oversampling to prevent radial k-space-related artifacts.
In modern scanners, respiratory gating is achieved using phase scout navigators placed inside the liver tissues. In older-generation scanners, the liver dome respiratory trigger method can be utilized. However, in our department, we prefer using phase scout navigators. For respiratory-gated scans utilizing phase scout navigators, it is essential to accurately position the respiratory navigator box within the liver. Ensure that no part of the navigation box extends beyond the liver boundaries. Planning should be conducted using a free-breathing localizer, as the diaphragm’s downward movement during inhalation can result in improper slice planning and positioning of the respiratory navigator box.

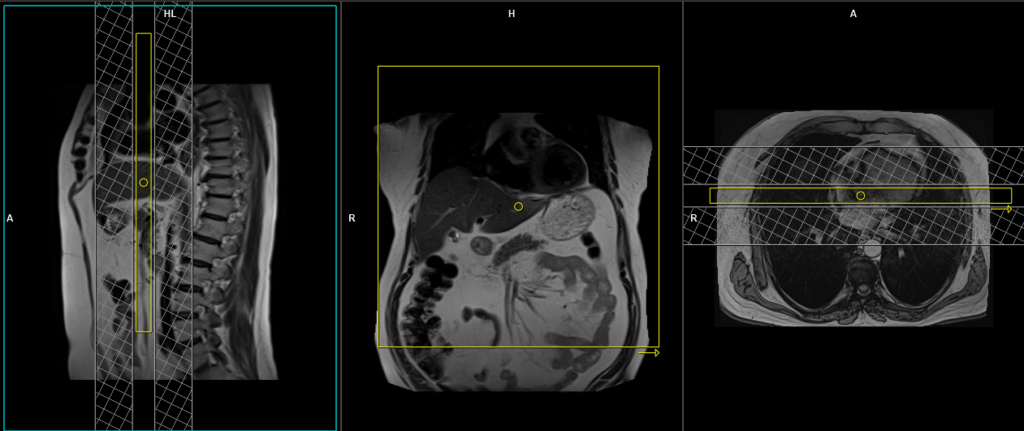
Phase scout respiratory gating
Phase scout respiratory gating is a technique used to synchronize image acquisition with the patient’s respiratory motion. It involves acquiring a low-resolution, single-shot MR image during free breathing, referred to as a phase scout or navigator scan. This scout image is typically acquired in the liver region, as it exhibits prominent respiratory motion.
The acquired phase scout image is used to track the patient’s respiratory motion by monitoring changes in the position of anatomical structures, such as the diaphragm or liver dome, between successive acquisitions. The position information is then used to trigger the start of image acquisition at specific phases of the respiratory cycle, typically during end-expiration when motion artifacts are minimal.
By employing phase scout respiratory gating, scanner can acquire images at specific respiratory phases, resulting in reduced motion artifacts and improved image quality. This technique is particularly beneficial when imaging anatomical regions affected by respiratory motion, such as the liver, allowing for clearer and more accurate diagnostic images.

BLADE(PROPELLER)
BLADE is an innovative MRI technique designed to minimize the impact of motion during MRI examinations. With BLADE acquisition, the k-space data is gathered in concentric rectangular strips that rotate around the k-space. Each strip acquisition samples the central portion of the k-space. The phase, translation, and rotation corrections are performed using an averaged strip.
Parameters
TR 3000-4000 | TE 90 | FLIP 140 | NEX 1 | SLICE 3MM | MATRIX 320×320 | FOV 350 | PHASE A>P | OVERSAMPLE 100% | TRIGGER YES |
T2 TSE fat-suppressed BLADE / T2 STIR axial gated
Plan the axial slices on the coronal free-breathing localizer images and position the block horizontally across the liver, as shown. Verify the positioning in the other two planes. Establish an appropriate angle in the sagittal plane, aligning it horizontally across the liver. The slices must be sufficient to cover the entire liver from the diaphragm down to the C loop of the duodenum. The phase direction can either be right to left or anterior-posterior, as radial k-space sampling will eliminate potential motion artifacts. Use phase oversampling to prevent radial k-space-related artifacts.
Parameters
TR 5000-6000 | TE 90 | FLIP 140 | NEX 1 | SLICE 3MM | MATRIX 320×320 | FOV 350 | PHASE A>P | FAT SAT SPAIR | TRIGGER YES |
DWI epi 3 scan trace axial 3mm free breathing
Plan the axial slices on the coronal free-breathing localizer images and position the block horizontally across the liver, as shown. Verify the positioning in the other two planes. Establish an appropriate angle in the sagittal plane by aligning it horizontally across the liver. Ensure that the slices adequately cover the entire liver, from the diaphragm down to the C loop of the duodenum. Consider adding saturation bands at the top and bottom of the block to minimize artifacts caused by fat signal, arterial pulsation, and breathing.

Parameters
TR 6000-7000 | TE 90 | IPAT ON | NEX 3 5 8 | SLICE 3 MM | MATRIX 192X192 | FOV 200-250 | PHASE R>L | GAP 10% | B VALUE 0 |
T1 VIBE 3D fat suppressed\VIBE DIXON breath hold coronal
Plan the coronal slices on the axial localizer and position the block horizontally across the liver as depicted. Verify the position in the other two planes. Establish an appropriate angle in the sagittal plane, aligning it vertically across the liver. Ensure that the slices adequately cover the entire liver, extending from the anterior abdominal wall to the erector spinae muscles. To prevent wrap-around artifacts, phase oversampling, and in the case of 3D blocks, slice oversampling must be used. Instruct the patient to hold their breath during image acquisition. (In our department, we typically instruct patients to take two breaths in and out before providing the “breathe in and hold” instruction.)
VIBE
VIBE stands for Volumetric Interpolated Breath-hold Examination. It is a modified 3D-FLASH MR technique that enables high spatial resolution imaging while the patient holds their breath. VIBE sequences are especially valuable for assessing soft tissue and vasculature simultaneously.
Parameters
TR 4-5 | TE 2-3 | FLIP 10 | NEX 1 | SLICE 3MM | MATRIX 256×256 | FOV 350 | PHASE R>L | OVERSAMPLE 50% | TRIGGER NO |
T1 In-opposed phase breath hold axial
Plan the axial slices on the coronal breath-hold T1 images and position the block horizontally across the liver, as shown. Verify the positioning in the other two planes. Establish an appropriate angle in the sagittal plane, aligning it horizontally across the liver. The slices must be sufficient to cover the entire liver from the diaphragm down to the C loop of the duodenum. To prevent wrap-around artifacts, phase oversampling, and in the case of 3D blocks, slice oversampling must be used. Instruct the patient to hold their breath during image acquisition. In our department, we typically ask patients to take two breaths in and out before instructing them to “breathe in and hold.”


In-opposed phase
In-phase and opposed-phase imaging utilize multi-echo techniques, acquiring two echoes per excitation pulse simultaneously. The main difference between in-phase and opposed-phase imaging lies in the choice of echo time (TE), with in-phase imaging using a long TE of 4.5, while opposed-phase imaging employs a shorter TE of 2.3. In-phase and opposed-phase GRE imaging proves highly valuable in diagnosing focal or diffuse fatty infiltration. This is due to the distinct resonance frequencies of fat and water protons at different TE values. In-phase and opposed-phase images are captured when fat and water protons resonate either “in-phase” or 180 degrees “out-of-phase” with each other. In normal liver tissue, the signal intensity remains consistent between in-phase and opposed-phase images and is always greater than the signal intensity of the spleen. However, in cases of fatty liver, the opposed-phase images exhibit reduced signal intensity, which may be equal to or lower than that of the spleen. Additionally, chemical shift imaging proves useful for characterizing lesions by demonstrating the presence of fat within tumors.
Parameters
TR 7-9 | TE IN 2-3 OPP 4-5 | FLIP 10 | NEX 1 | SLICE 3MM | MATRIX 256×256 | FOV 350 | PHASE A>P | OVERSAMPLE 50% | BW IN 350 OPP 240 |
T2 tse breath hold with TE 90 AND TE 180
Plan the axial slices on the coronal breath-hold T1 images and position the block horizontally across the liver, as shown. Verify the positioning in the other two planes. Establish an appropriate angle in the sagittal plane, aligning it horizontally across the liver. The slices must be sufficient to cover the entire liver from the diaphragm down to the C loop of the duodenum. To prevent wrap-around artifacts, phase oversampling, and in the case of 3D blocks, slice oversampling must be used. Instruct the patient to hold their breath during image acquisition. In our department, we typically ask patients to take two breaths in and out before instructing them to “breathe in and hold.”
Why different TEs?
T2 TSE scans with varying TE values offer valuable information for lesion characterization in the liver. Lesions like haemangioma, HCC, and cysts exhibit hyperintensity (brightness) on T2-weighted scans with a TE of 90. Conversely, HCC appears hypointense (dark) on T2 scans with a TE of 180, while cysts and haemangiomas maintain their appearance. These distinct patterns observed in T2-weighted scans at different TE values aid in differentiating and characterizing liver lesions accurately.
Parameters
TR 5000-7000 | TE 90 | FLIP 150 | NEX 1 | SLICE 4MM | MATRIX 256×256 | FOV 350 | PHASE A>P | OVERSAMPLE 50% | IPAT ON |
TR 5000-7000 | TE 180 | FLIP 150 | NEX 1 | SLICE 4MM | MATRIX 256×256 | FOV 350 | PHASE A>P | OVERSAMPLE 50% | IPAT ON |
T1 vibe DIXON/ FLASH fat saturated axial breath hold pre-contrast
Plan the axial slices on the coronal breath-hold T1 images and position the block horizontally across the liver, as shown. Verify the positioning in the other two planes. Establish an appropriate angle in the sagittal plane, aligning it horizontally across the liver. The slices must be sufficient to cover the entire liver from the diaphragm down to the C loop of the duodenum. To prevent wrap-around artifacts, phase oversampling, and in the case of 3D blocks, slice oversampling must be used. Instruct the patient to hold their breath during image acquisition. In our department, we typically ask patients to take two breaths in and out before instructing them to “breathe in and hold.”
Parameters FLASH
TR 4-5 | TE 2 | FLIP 12 | NEX 1 | SLICE 3MM | MATRIX 320X320 | FOV 350 | PHASE A>P | OVERSAMPLE 50% | IPAT ON |
Parameters VIBE DIXON
TR 6-7 | TE 2.39 4.77 | FLIP 10 | NXA 1 | SLICE 3 MM | MATRIX 320×320 | FOV 320-350 | PHASE A>P | OVERSAMPLE 20% | BH YES |
contrast administration and timing of scans
Guess timing technique:-
This is one of the simplest methods. It works by estimating the time it takes for contrast to travel from the site of injection to the vascular structures of the liver. This technique is highly dependent on factors such as the site of contrast injection, patient’s age, cardiac output, and vascular anatomy. Generally, it takes about 18-25 seconds for the contrast to travel from the antecubital vein to the abdominal aorta and 45-60 seconds to reach the portal veins. Therefore, the first acquisition of the dynamic sequence should begin within 20 seconds of contrast administration.
Care bolus technique:-
The care bolus technique is the most commonly used method for bolus detection. This technique involves employing a coronal fast gradient refocused sequence to obtain real-time images every second through the vascular structure of interest, typically positioned over the heart. By monitoring the arrival of the contrast bolus in the heart, the operator can then switch to the centric 3D dynamic sequence for further imaging.
Planning care bolus
Plan the coronal care bolus slice on the sagittal plane. Position the block over the mid-heart and angle the slice parallel to the ascending aorta. Verify the position in the other two planes. Determine the suitable angle in the axial plane, aligning it horizontally across the heart. To reduce artifacts caused by breathing and heart motion, utilize a saturation band on both sides of the block.
Care bolus scans should commence one second before contrast administration. The operator can then observe the scans in real-time and monitor the arrival of the contrast bolus in the heart. Once the contrast reaches the heart, the care bolus should be promptly halted, and the patient should be instructed to hold their breath before initiating the centric 3D dynamic sequence.
T1 vibe dixon\ flash 3D fat sat axial breath hold dynamic
Plan the axial slices on the coronal breath-hold T1 images and position the block horizontally across the liver, as shown. Verify the positioning in the other two planes. Establish an appropriate angle in the sagittal plane, aligning it horizontally across the liver. The slices must be sufficient to cover the entire liver from the diaphragm down to the C loop of the duodenum. To prevent wrap-around artifacts, phase oversampling, and in the case of 3D blocks, slice oversampling must be used. Instruct the patient to hold their breath during image acquisition.
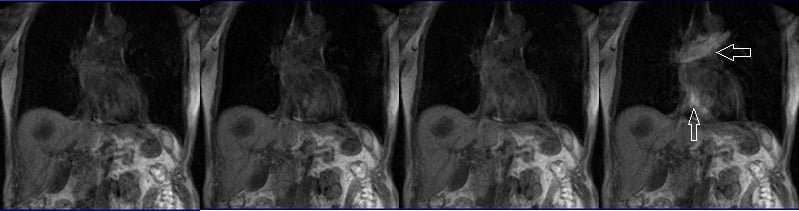
A dynamic VIBE dixon 3D sequence consists of three VIBE 3mm 3D scans with a 10-second delay between the first and second scans, and a 5-minute delay between the second and third scans. The first scan is for the arterial phase, the second for the portal venous phase, and the last for the equilibrium phase. Timing of each scan is very important, especially for the arterial and portal venous phases. It is important to give proper breathing instructions during the first and second scans, as well as between the second and third scans. Ask the patient to breathe normally after the arterial phase scan, and then ask them to hold their breath when there are about 4 seconds left for the venous scan. Repeat the same instructions between the second and third scans.
Alternatively, the post-contrast dynamic scans can be performed by splitting the sequence into three different scans and performing them individually according to their respective timeline. In our department, we prefer to do them separately.
A proper arterial phase acquisition should only show marked enhancement of the hepatic arteries, pancreas, and spleen with little or no enhancement of hepatic veins. Since most liver tumors receive their blood supply from the hepatic artery, the maximum enhancement of the tumor will occur in the hepatic arterial phase. Proper timing of the arterial phase is crucial because the time window between the arrival of contrast in the hepatic artery and the filling of the hepatic veins and liver is relatively narrow. Many hypervascular lesions are only visible during this time. If the imaging is performed too late, the liver parenchyma starts to enhance in the portal venous phase, potentially obscuring a hypervascular lesion. The hepatic arterial dominant phase normally occurs 20-50 seconds after the start of the injection, so the arterial phase scans must be acquired during this period. If using the Guess timing method, the arterial scans should start approximately 20 seconds after the start of the injection, and the scan time should be less than 30 seconds. The Care Bolus technique offers a more reliable timing method, allowing the operator to watch the Care Bolus scan in real-time and start the liver scan immediately after the contrast reaches the heart (the contrast can pass from the heart to the hepatic arteries in less than 4 seconds).
Hepatic vein dominant phase normally occurs 60-90 seconds from the start of the injection, so the portal venous phase scans must be acquired during this period. If you are using the Guess timing method, portal venous scans must start about 60 seconds from the start of injection, and the scan time must be less than 30 seconds. For the care bolus technique, give a 10-20 second delay after finishing the arterial scans (scan starts after 20 seconds + scan time 20 seconds = 40 seconds + 20 seconds delay = 60 seconds). In the portal venous phase, the liver parenchyma enhances maximally, allowing for easy detection of any hypovascular tumors in this phase.
The equilibrium phase starts when contrast is moving away from the liver parenchyma, and the liver starts to decrease in density. The equilibrium phase normally occurs 2-5 minutes after the injection, so the equilibrium phase scans must be acquired during this period. Tumors that lose contrast slower than normal liver tissue will show up bright in this scan (e.g., hemangioma). Tumors that wash out quickly will appear dark compared to normal liver parenchyma (e.g., HCC).

Parameters FLASH
TR 4-5 | TE 2 | FAT SAT ON | NEX 1 | SLICE 3MM | MATRIX 320X320 | FOV 350 | PHASE A>P | DYNAMIC 3 SCANS | IPAT ON |
Parameters VIBE DIXON
TR 6-7 | TE 2.39 4.77 | FLIP 10 | NXA 1 | SLICE 3 MM | MATRIX 320×320 | FOV 320-350 | PHASE A>P | OVERSAMPLE 20% | BH YES |
DWI epi 3 scan trace axial 3mm free breathing
Plan the axial slices on the coronal free-breathing localizer images and position the block horizontally across the liver, as shown. Verify the positioning in the other two planes. Establish an appropriate angle in the sagittal plane by aligning it horizontally across the liver. Ensure that the slices adequately cover the entire liver, from the diaphragm down to the C loop of the duodenum. Consider adding saturation bands at the top and bottom of the block to minimize artifacts caused by fat signal, arterial pulsation, and breathing.
Parameters
TR 6000-7000 | TE 90 | IPAT ON | NEX 3 5 8 | SLICE 3 MM | MATRIX 192X192 | FOV 200-250 | PHASE R>L | GAP 10% | B VALUE 0 |
T1 VIBE DIXON/ flash 3D fat sat axial delayed 20 minutes
Plan the axial slices on the coronal breath-hold T1 images and position the block horizontally across the liver, as shown. Verify the positioning in the other two planes. Establish an appropriate angle in the sagittal plane, aligning it horizontally across the liver. The slices must be sufficient to cover the entire liver from the diaphragm down to the C loop of the duodenum. To prevent wrap-around artifacts, phase oversampling, and in the case of 3D blocks, slice oversampling must be used. Instruct the patient to hold their breath during image acquisition.
Delayed phase is necessary for the characterization of lesions. Many liver lesions exhibit progressive filling patterns. Haemangioma typically demonstrates progressive fill-in, with lesion density similar to that of the blood pool. Most hypovascular metastatic lesions exhibit a peripheral enhancement pattern with no central enhancement. Cholangiocarcinomas display a progressive enhancement pattern, with maximum enhancement in the delayed phase due to the slow enhancement of the fibrous center.
Parameters FLASH
TR 4-5 | TE 2 | FLIP 12 | NEX 1 | SLICE 3MM | MATRIX 320X320 | FOV 350 | PHASE A>P | OVERSAMPLE 50% | IPAT ON |
Parameters VIBE DIXON
TR 6-7 | TE 2.39 4.77 | FLIP 10 | NXA 1 | SLICE 3 MM | MATRIX 320×320 | FOV 320-350 | PHASE A>P | OVERSAMPLE 20% | BH YES |