Whole Body MRA : Protocol and Planning
Indications for MRA(magnetic resonance angiography) whole body
- Symptomatic lower extremity ischemia
- Prior to digital subtraction angiography
- Post operative and stent evaluation
- Arteriovenous malformation
- Post traumatic assessment
- Chronic critical ischemia
- Intermittent claudication
- Chronic arterial disease
- Acute arterial disease
- Congenital disorders
- Atherosclerosis
Contraindications
- Any electrically, magnetically or mechanically activated implant (e.g. cardiac pacemaker, insulin pump biostimulator, neurostimulator, cochlear implant, and hearing aids)
- Intracranial aneurysm clips (unless made of titanium)
- Pregnancy (risk vs benefit ratio to be assessed)
- Ferromagnetic surgical clips or staples
- Metallic foreign body in the eye
- Metal shrapnel or bullet
Patient preparation for MRA whole body
- A satisfactory written consent form must be taken from the patient before entering the scanner room
- Ask the patient to remove all metal object including keys, coins, wallet, any cards with magnetic strips, jewellery, hearing aid and hairpins
- Ask the patient to undress and change into a hospital gown
- Instruct the patient to hold their breath for the breath hold scans (its better to coach the patient two to three times before starting the scan)
- An intravenous line must be placed with extension tubing extending out of the magnetic bore
- Contrast injection risk and benefits must be explained to the patient before the scan
- Gadolinium should only be given to the patient if GFR is > 30
- Claustrophobic patients may be accompanied into the scanner room e.g. by staff member or relative with proper safety screening
- Offer headphones for communicating with the patient and ear protection
- Explain the procedure to the patient and answer questions
- Note down the weight of the patient
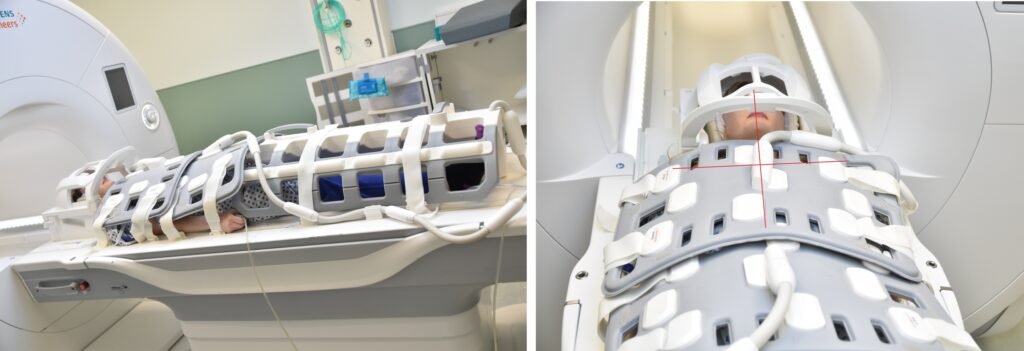
Positioning for peripheral MRA
- Position the patient in supine position with head pointing towards the magnet (head first supine)
- Position the patient over the spine. Place the neck and head coil, then the peripheral coil over the legs, two body coils over the abdomen and chest, head and neck coil over the head and neck area
- Centre the laser beam localiser over sternoclavicular joint
Recommended Whole Body MRA Protocols and Planning
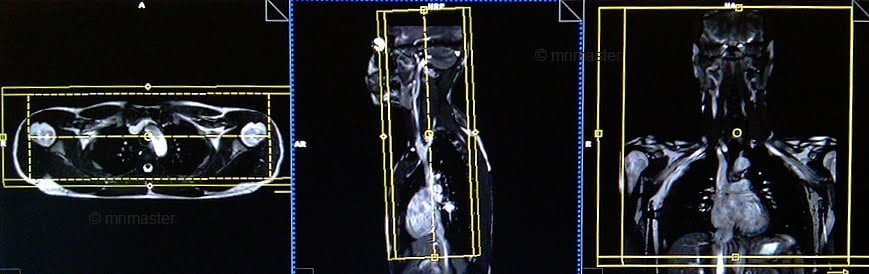
localiser chest, neck and head
Initiate with a three-plane TrueFISP localizer for localization and sequencing. Utilize fast, single-shot localizers with acquisition times below 25s, ideal for vascular localization. Capture 5-8 slices per plane for optimal results. Configure Whole Body MRA Protocol to automatically shift the table post neck and chest localization. Typically, a default auto-move of 380-420 mm is applied, progressing the table headward for abdominal scans after neck and chest localization.

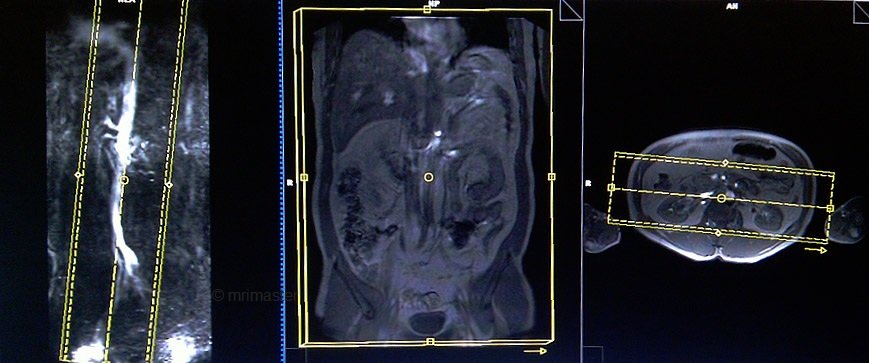
localiser MRA abdomen
A three-plane T1 or TrueFISP localizer must be acquired in the abdomen to localize and plan the sequences.”

Phase contrast(PC) vessel localiser abdomen
A sagittal Phase Contrast vessel localizer is required in the abdomen for further localization and planning of the coronal 3D FLASH sequence. Phase contrast localizers are rapid scans with acquisition times of under 1 minute, which are excellent for localizing vascular structures. The Whole Body MRA Protocol should include an automatic table movement after acquiring the abdomen localizer. Typically, a default auto move of 380-420 mm is set in the Whole Body MRA Protocol. This means that after acquiring the abdomen localizer, the table will automatically move toward the head for upper leg scans.
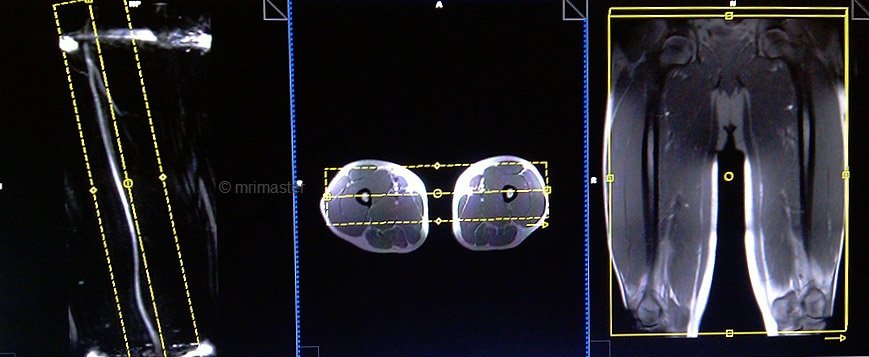
localiser MRA upper leg
Capture a T1-weighted three-plane localizer in the upper leg to localize and plan the sequences.
Phase contrast(PC) vessel localiser upper leg
A sagittal Phase Contrast vessel localizer is required in the upper leg to guide subsequent coronal 3D FLASH sequence planning. Phase contrast localizers, with under 1-minute acquisition time, efficiently localize vascular structures. Set up the protocol with an automated table shift following upper leg localization. Typically, MRA leg protocols feature a default 380-420 mm auto-shift, moving the table headward for lower leg scans.
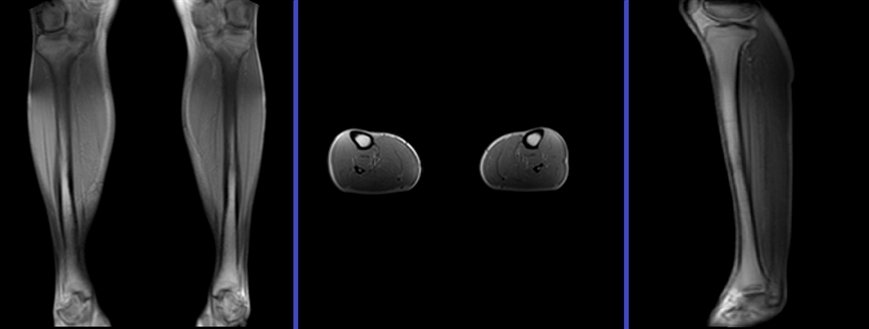
localiser MRA lower leg
A T1-weighted three-plane localizer is required in the lower leg to localize and plan the sequences.
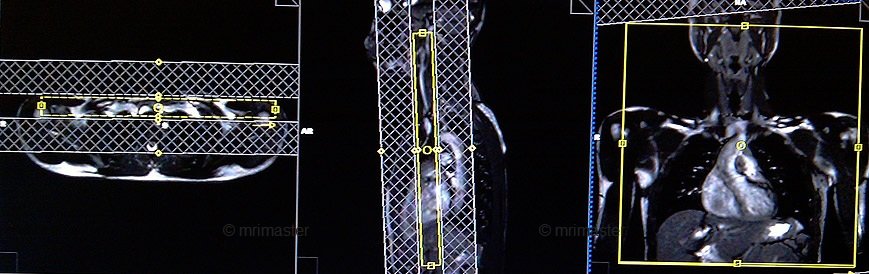
T1 flash 3D coronal 0 .9mm -1.1mm pre-contrast chest and neck
Plan the coronal slices along the sagittal plane. Angle the positioning block parallel to the carotid arteries and veins (or alternatively, parallel to the cervical spine). Verify the positioning block in the other two planes. Apply an appropriate angle in the axial plane (parallel to both shoulder joints). Ensure sufficient coverage, spanning from the anterior chest wall to the spinous processes of the vertebrae. Set the field of view (FOV) to encompass both shoulder joints. Utilize ample phase oversampling and slice oversample to prevent wrap-around artifacts. Instruct the patient to hold their breath during image acquisition (typically preceded by two deep breaths). Recommend employing parallel acquisition techniques to reduce scan time (aim for less than 15 seconds for optimal results).
Parameters
TR 2-3 | TE 1-2 | FLIP 20 | NEX 1 | SLICE 1 MM | MATRIX 384×320 | FOV 400-450 | PHASE R>L | OVERSAMPLE 50% | IPAT OFF |
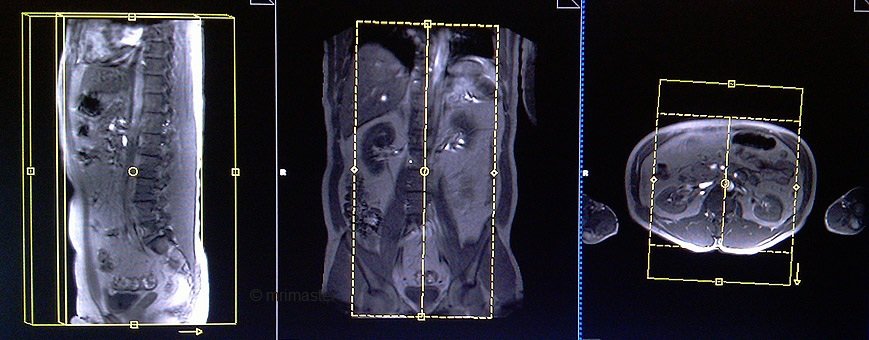
T1 flash 3D coronal 0 .9mm -1.1mm pre-contrast abdomen
Plan the coronal slices using the sagittal Phase Contrast vessel localiser. Angle the position block parallel to the aorta. Verify positioning in the other two planes. Apply an appropriate angle in the axial plane (parallel to the long axis of both kidneys). Ensure sufficient slices to cover the aorta and iliac arteries. Use a large enough FOV to encompass vessels from the heart to femoral arteries. Employ ample phase oversampling and slice oversample to prevent wrap-around artifacts. Instruct the patient to hold their breath during image acquisition. Overlap chest and abdominal blocks by 1 to 2 centimeters to avoid misregistration. Highly recommend using parallel acquisition for reduced scan time (less than 15 seconds for optimal results). Set up protocol with table auto-move after abdominal 3D flash acquisition.
Parameters
TR 4-5 | TE 2-3 | FLIP 10 | NEX 1 | SLICE 1 MM | MATRIX 384×384 | FOV 430-470 | PHASE R>L | OVERSAMPLE 50% | IPAT ON |
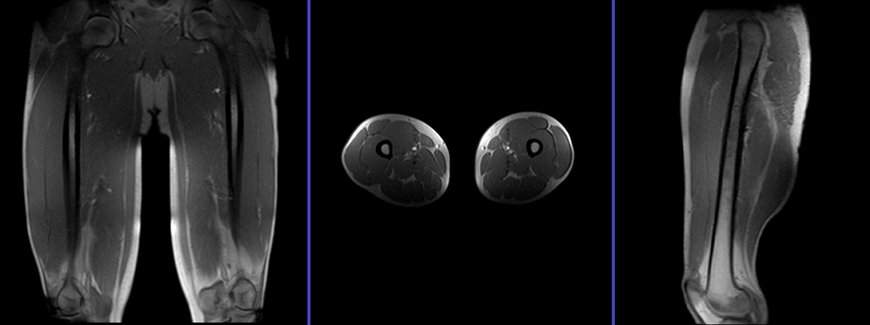
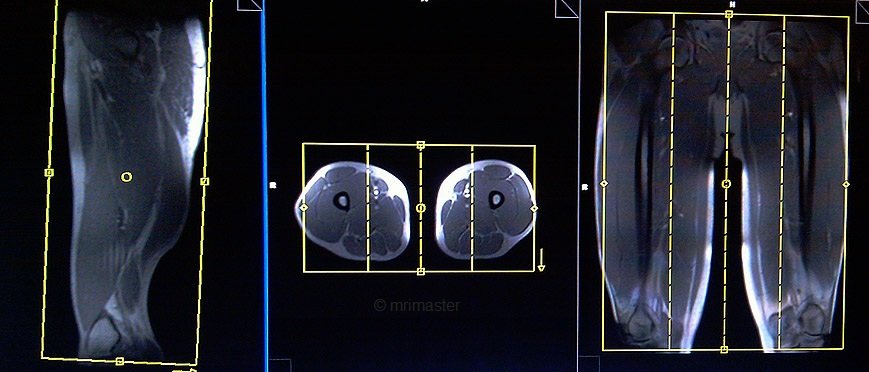
T1 flash 3D coronal 0 .9mm -1.1mm pre-contrast upper legs
Plan coronal slices using the sagittal Phase Contrast vessel localizer. Angle the positioning block parallel to the femoral arteries. Check positioning in the other two planes. Use an appropriate angle in the axial plane (parallel to both femurs). Ensure sufficient slices for femoral artery coverage. The FOV should encompass vessels from iliac to popliteal arteries. Apply phase and slice oversampling to prevent wrap-around artifacts. Overlap abdominal and femoral blocks by 1 to 2 centimeters to prevent misregistration. Utilize parallel acquisition for faster scans (less than 15 seconds). Set up auto table move after upper leg 3D flash acquisition in the protocol.
Parameters
TR 4-5 | TE 2-3 | FLIP 10 | NEX 1 | SLICE 1 MM | MATRIX 384×384 | FOV 430-470 | PHASE R>L | OVERSAMPLE 50% | IPAT ON |
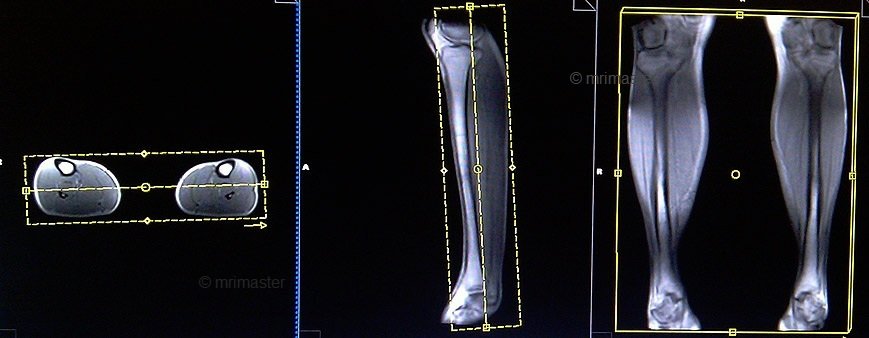
T1 flash 3D coronal 1mm -1.3mm pre-contrast lower legs
Plan coronal slices using the sagittal localizer. Align the position block parallel to both tibiae. Verify positioning in other planes. Apply appropriate axial angle (parallel to right and left tibia). Ensure sufficient slices for complete lower leg coverage. Field of view (FOV) should encompass vessels from knee to ankle joints. Use ample phase and slice oversampling to prevent wrap-around artifacts. Overlap upper and lower leg blocks by 1 to 2 centimeters to prevent misregistration. Utilize parallel acquisition for shorter scan time (less than 15 seconds) and optimal results.
Parameters
TR 4-5 | TE 2-3 | FLIP 10 | NEX 1 | SLICE 1 MM | MATRIX 384×384 | FOV 430-470 | PHASE R>L | OVERSAMPLE 50% | IPAT ON |
Contrast administration and timing of scans
Guess timing technique:-
This is one of the simplest methods. It works by estimating the time it takes for contrast to travel from the site of injection to the vascular structures of the liver. This technique is highly dependent on factors such as the site of contrast injection, patient’s age, cardiac output, and vascular anatomy. Generally, it takes about 18-25 seconds for the contrast to travel from the antecubital vein to the abdominal aorta and 45-60 seconds to reach the portal veins. Therefore, the first acquisition of the dynamic sequence should begin within 20 seconds of contrast administration.
Care bolus technique:-
The care bolus technique is the most commonly used method for bolus detection. This technique involves employing a coronal fast gradient refocused sequence to obtain real-time images every second through the vascular structure of interest, typically positioned over the heart. By monitoring the arrival of the contrast bolus in the heart, the operator can then switch to the centric 3D dynamic sequence for further imaging.
Planning care bolus
Plan the coronal care bolus slice on the sagittal plane. Position the block over the mid-heart and angle the slice parallel to the ascending aorta. Verify the position in the other two planes. Determine the suitable angle in the axial plane, aligning it horizontally across the heart. To reduce artifacts caused by breathing and heart motion, utilize a saturation band on both sides of the block.
Care bolus scans must start one second prior to contrast administration. The operator can then observe the scans live and await the contrast bolus’ arrival in the heart. Once the contrast reaches the heart, immediately stop the care bolus and instruct the patient to hold their breath before commencing the centric 3D dynamic sequence.
T1 flash 3D coronal 0 .9mm -1.1mm post-contrast chest and neck
Plan the coronal slices along the sagittal plane. Angle the positioning block parallel to the carotid arteries and veins (or alternatively, parallel to the cervical spine). Verify the positioning block in the other two planes. Apply an appropriate angle in the axial plane (parallel to both shoulder joints). Ensure sufficient coverage, spanning from the anterior chest wall to the spinous processes of the vertebrae. Set the field of view (FOV) to encompass both shoulder joints. Utilize ample phase oversampling and slice oversample to prevent wrap-around artifacts. Instruct the patient to hold their breath during image acquisition.
Parameters
TR 2-3 | TE 1-2 | FLIP 20 | NEX 1 | SLICE 1 MM | MATRIX 384×320 | FOV 400-450 | PHASE R>L | OVERSAMPLE 50% | IPAT OFF |
***If patients can sustain breath-holding for 32 seconds (as most can), perform combined chest and abdomen scans within one breath hold: 15 seconds per scan and 2 seconds for table movement***
T1 flash 3D coronal 0 .9mm -1.1mm post-contrast abdomen
Plan the coronal slices using the sagittal Phase Contrast vessel localiser. Angle the position block parallel to the aorta. Verify positioning in the other two planes. Apply an appropriate angle in the axial plane (parallel to the long axis of both kidneys). Ensure sufficient slices to cover the aorta and iliac arteries. Use a large enough FOV to encompass vessels from the heart to femoral arteries. Employ ample phase oversampling and slice oversample to prevent wrap-around artifacts. Instruct the patient to hold their breath during image acquisition. Overlap chest and abdominal blocks by 1 to 2 centimeters to avoid misregistration. Set up protocol with table auto-move after abdominal 3D flash acquisition.
Parameters
TR 4-5 | TE 2-3 | FLIP 10 | NEX 1 | SLICE 1 MM | MATRIX 384×384 | FOV 430-470 | PHASE R>L | OVERSAMPLE 50% | IPAT ON |
T1 flash 3D coronal 0 .9mm -1.1mm post-contrast upper leg
Plan coronal slices using the sagittal Phase Contrast vessel localizer. Angle the positioning block parallel to the femoral arteries. Check positioning in the other two planes. Use an appropriate angle in the axial plane (parallel to both femurs). Ensure sufficient slices for femoral artery coverage. The FOV should encompass vessels from iliac to popliteal arteries. Apply phase and slice oversampling to prevent wrap-around artifacts. Overlap abdominal and femoral blocks by 1 to 2 centimeters to prevent misregistration.
Parameters
TR 4-5 | TE 2-3 | FLIP 10 | NEX 1 | SLICE 1 MM | MATRIX 384×384 | FOV 430-470 | PHASE R>L | OVERSAMPLE 50% | IPAT ON |
T1 flash 3D coronal 1mm -1.3mm post-contrast lower leg
Plan coronal slices using the sagittal localizer. Align the position block parallel to both tibiae. Verify positioning in other planes. Apply appropriate axial angle (parallel to right and left tibia). Ensure sufficient slices for complete lower leg coverage. Field of view (FOV) should encompass vessels from knee to ankle joints. Use ample phase and slice oversampling to prevent wrap-around artifacts. Overlap upper and lower leg blocks by 1 to 2 centimeters to prevent misregistration.
Parameters
TR 4-5 | TE 2-3 | FLIP 10 | NEX 1 | SLICE 1 MM | MATRIX 384×384 | FOV 430-470 | PHASE R>L | OVERSAMPLE 50% | IPAT ON |
CLICK THE SEQUENCES BELOW TO CHECK THE SCANS
- LOCALIZER_TRUFI_3 PLANE HEAD AND NECK1
- LOCALIZER_3 PLANE CHEST &ABDOMEN2
- LOCALIZER_3 PLANE PC 2D_ABDOMEN3
- LOCALIZER_3 PLANE_UPPER LEGS4
- LOCALIZER_3 PLANE PC 2D_UPPER LEGS5
- LOCALIZER_3 PLANE_LOWER LEGS6
- T1_FLASH_CORONAL_HEAD, NECK & CHEST_PRE7
- T1_FLASH_CORONAL_CHEST & ABDOMEN PRE8
- T1_FLASH_CORONAL_UPPER LEGS_PRE9
- T1_FLASH_CORONAL_LOWER LEGS_PRE10
- CARE BOLUS

- T1_FLASH_CORONAL_HEAD, NECK & CHEST_POST11
- T1_FLASH_CORONAL_CHEST & ABDOMEN POST12
- T1_FLASH_CORONAL_UPPER LEGS_-POST13
- T1_FLASH_CORONAL_LOWER LEGS_-POST14

